
Barcode Scanner Raspberry Pi
Want to see this post as a PDF? Go ahead and take a look at the Body Camera for Raspberry Pi document.
After getting the Pi setup to take some pictures and mounting it as a solar powered body camera I wanted to explore what else could be done. Getting an image is easy enough but processing what is in that image is the next step and while the motion detection of the body cam is great I wanted to go for some form of image recognition.
Instead of jumping to facial recognition I figured starting lower tech would be more straightforward and a Reddit post suggested the perfect application, a barcode scanner to control a media library by scanning DVDs or even a shopping list tracker. The goal is to scan a barcode on a DVD and then launch the corresponding video, which is already saved somewhere.
Even though barcodes are rather low tech they can be used to do a lot since they replicate having a keyboard. Most terminals, including the pi, will see a barcode as just a string of text. If you are scanning a known set of barcodes, like a DVD library or a food pantry, you can map each string of text to take an action, for example opening a corresponding video file. Depending on the size of the DVD library it could take a while to scan them all in, but assuming you have a digital copy of each one this can be worked into the initial ripping workflow fairly easily.
What’s more image libraries, including the popular SimpleCV, have multiple ways to process an image. That means that using a camera to recognize the barcode or QR is only a few steps away from color recognition, object recognition, and even face recognition. This means that you do not have to just use the barcode of the DVD, it is also possible to scan the image on the front of the DVD. In addition, by creating and printing custom QR codes you can label any object in the house and really lighten the programming load by having that custom code do all sorts of things
It is this philosophy that empowers a number of “image” inputs including some for image enabled toys. One example is the popular SmartToy, distributed by Fisher Price, as well as the Plobot. Both of these basically use an image sensor (camera) to let the hardware (or toy) take some action. This certainly seems to be an intuitive interface for kids, at least more so than browsing through common media libraries.
Workflow to setup Barcode reader on Pi and build a custom Barcode Library
So here is the journey to build a Raspberry Pi Barcode reader. The general outline to reading a barcode was lifted from a helpful blog Technoobsite. There were a few struggles along the way and some additions at the end to handle the library but the major steps are as follows:
- Setup Raspberry Pi
- Connect Camera
- Setup SimpleCV
- Get the Camera to talk to SimpleCV using uv4l driver
- Install the Zbar Library
- Read a barcode using a Python program
- Use that barcode to take open a file (for Video library)
- Use that barcode to open a website
- Create custom QR codes to label a library
Setup The Raspberry Pi:
A raspberry pi, an SD card for the Pi, and a camera are all that is required to pull this off. I used the Raspberry Pi 3 running Jessie on an 8Gb SD card. Additional storage may be needed to handle a large library and depending on your display set up the process will have to be setup differently to access the files. For this example I just wanted to prove that scanning a barcode could open a specific video file so using the pre-installed video player was all the was necessary.
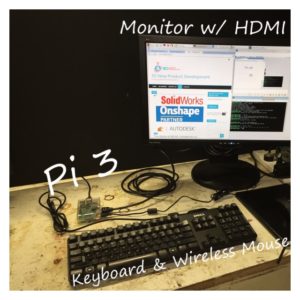
Connect a Raspberry PI Spy Camera:
A camera can be added to the setup either via a USB webcam or directly via the CSI port. Using a USB camera which is supported through drivers will help avoid some headaches but does make the build bigger.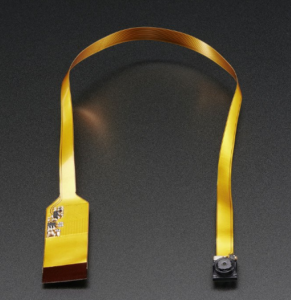
I have a Raspberry Pi Spy Cam from Adafruit for the CSI port which can be neatly tucked away or built into a handheld pi fairly easily. The power draw of the camera port is around 250mA, some USB cameras may be less so if the goal is to build a battery powered setup it is worth taking into consideration.
Details on physically connecting the camera module and enabling the camera are found here: https://www.raspberrypi.org/documentation/usage/camera/
Setup SimpleCV for Use on Raspberry Pi:
This involved installing SimpleCV which, according to their words “ It lets you work with the images or video streams that come from webcams, Kinects, FireWire and IP cameras, or mobile phones. It’s helps you build software to make your various technologies not only see the world, but understand it too.”
SimpleCV should be downloaded and installed and “sudo apt-get update” also helps to make sure everything is in place.
http://simplecv.sourceforge.net/doc/cookbook.html
Connect SimpleCV to use the Raspberry Pi Camera using UV4L Driver
After SimpleCV is setup it can be accessed by launching the simplecv shell. In python or the SimpleCV shell there is a command to call the camera that should be checked to verify the camera module is supported
cam = Camera()
But this tends to fail due if you are using the camera module and not a USB webcam. The error message shows:
WARNING: SimpleCV can’t seem to find a camera on your system, or the drivers do not work with SimpleCV.
So the new driver, using a UV4L is required. This is the major step that was glossed over by the technoobsite. It links out to some outdated files. I spent a decent about of time trouble shooting this with the recurring error even after finding the driver’s installation page.
WARNING: caught exception: SystemError(“Cannot identify ‘/dev/video0’: 2, No such file or directory”,)
Sure enough the /dev/video0 file did not exist. Cycling through the walk through helped, there were a few places where a reboot was useful. It was also helpful to ensure that nothing else was trying to access the camera. In the end a series of “sudo apt-get update” and reboot’s, while following the installation got things working. From simplecv shell the goal is to be able to run the following:
>>> cam = Camera()
>>> img = cam.getImage()
>>> img.show()
This initializes the camera, creates an image from it, and then displays that image in a separate viewer. If you can make that happen then the camera is being used correctly and the image is ready to be manipulated by further code.
Getting Zbar
This was easy enough following the instructions of Technoob, it’s a single command line entry of “sudo apt-get install zbar”. Zbar is an open software suite which specializes in barcode reading.
There is also an option to use a suite called ZXing but as a few commenters around the web note Zxing is not as open and Zbar seems to be more stable (again according to comments, I’ve not tried both). Regardless Zbar works well enough and has documentation to help learn more.
Reading a QR Code using a Python Script
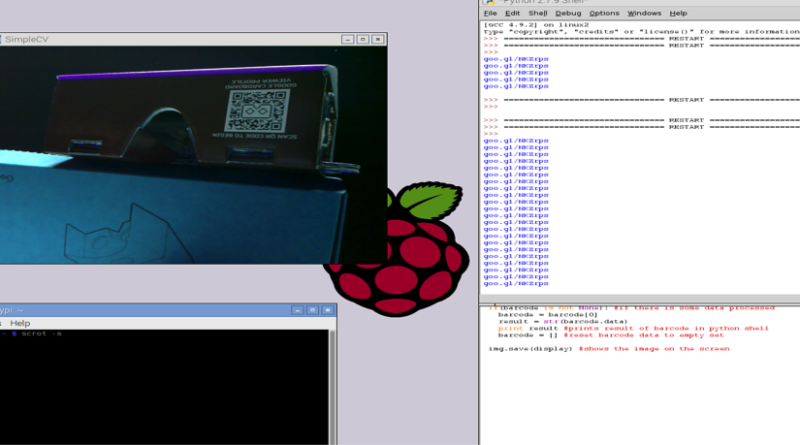
Technoob’s site has a simple script that pulls in the video feed from the camera and the installed libraries to ID the barcode, save the string of text, then print that string of text back out. This confirms that we can read an actual code but does not yet launch anything. The sample QR code that worked first for me was attached to a Google Cardboard headset and corresponded to a shortened URL. It is clear from this that the string input can be rather elaborate. If you invoke the script to use this string for something else, rather than just printing it back, a lot of options start to open up for what can be done.
It is worth noting that not every barcode I scanned worked so it is possible that some of the DVD library may not be readable. This could be worked around by just finding a barcode that does scan, then attaching it to the DVD box using some tape. It is also possible to go the other way, cutting the barcode off of the target and attaching it to something else, like a plush doll.
Open and launch of video from Python:
The pi and camera can now see a QR or barcode and print it’s data, but we also want to launch a specific file (ie. a movie) based on each code that is read. So first off how to launch a video file from Python. I simply wanted a “quick and dirty” way to prove that this all was possible so I looked for the easiest way to launch a file from python.
The “os.system()” command is great for this as it allows the script to execute a command line string. Of course on the Pi you can use the command line to launch a video viewer using “omxplayer. So adding the following line will launch a file
Import os
os.system(“omxplayer FILENAME.h264”)
A lot of QR codes are encoded URLs so I also wanted to check how to launch a browser. This also can be done with a single call.
import webbrowser
webbrowser.open(URLhere)
In either case there is a simple string that can be passed on from barcode.data so in the case of the URL the following line does the trick.
webbrowser.open(barcode.data)
The only step this misses is checking the string against a library. The best method to build and check really depends on the size of the library desired. Since I had a few QR codes working I just put a manual check in place by defining my the variable for title1 and assigning it the string I know the QR code will scan. A simple If statement checks to see if what scans matches the title and if it does it goes ahead and launches a hard coded video file.
from SimpleCV import Color,Camera,Display
import os
import webbrowser

cam = Camera() #starts the camera
display = Display()
title1 = str("goo.gl/NKZrps") #A Known barcode

while(display.isNotDone()):

img = cam.getImage() #gets image from the camera

barcode = img.findBarcode() #finds barcode data from image
if(barcode is not None): #if there is some data processed
barcode = barcode[0]
result = str(barcode.data)
if result == title1: #if barcode scan matches a specific in the library launch a file
os.system("omxplayer trial.h264")
print result #prints result of barcode in python shell
webbrowser.open(barcode.data)
#Above line launches a browser to link scanned. Returns error if not a URL
barcode = [] #reset barcode data to empty set

img.save(display) #shows the image on the screen
Creating QR Codes to build a custom library:
As noted there are a few barcodes that I found difficult to get scanning correctly but there is always the option to create custom barcodes that are verified. The upside of this is that they can have any string of data attached to it so in the case of launching a browser window or a specific file name you can ensure that the string returned is exactly the variable needed.
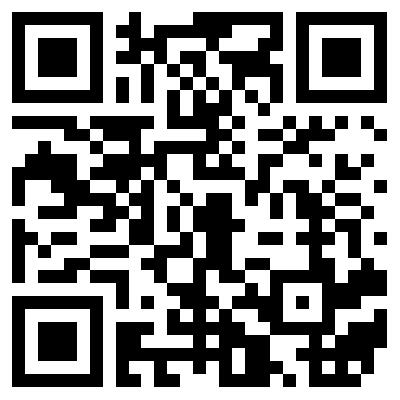
Using an online QR code reader I quickly made this one (on left), which is coded to a youtube video for some My Little Pony.
Taking from the original inspiration I like that this could be used by kids to launch not only DVDs within a library but also attach a code to pretty much anything to let them launch something. In this case the MLP QR code can be printed out and taped directly to a toy.
Summary
This is the least complex way to setup a barcode reader that I could find. The addition of a barcode creator opens up the possibilities for hacking together something interesting by creating and labeled pretty much anything. A library for checking tools in/out as you lend them, a timeclock that sans badges, even a simple scavenger hunt can be taken to the next level. This is not as efficient as grabbing an off-the-shelf barcode reader but for any Pi application that already includes a camera it can drastically increase the potential uses. If you happen to have any unique applications please reach out.
Learn a little more about Barcodes and QR codes, including how and where to register them, on our other posts.
Pingback: Pixela: Amazon Alexa with a Touchscreen and Barcode Reader for $130 – New Product Development
Pingback: Creating and Using Custom Barcodes and UPCs – New Product Development